

Introduction
A kitchen cleaning brush is one of the most underrated tools in any home. While sponges may seem convenient, they often trap moisture and bacteria faster, which can make your kitchen less hygienic over time. A good brush, on the other hand, scrubs deeper, dries faster, and helps you clean hard-to-reach areas like corners, grout lines, sink drains, and stove edges.
However, not every brush is built for every job. Some are too stiff for cookware, while others are too soft to remove grease. That’s why choosing the right kitchen cleaning brush matters more than people realize. If you use the wrong one, you waste time and spread germs.
In this guide, you’ll learn exactly which brush types work best, how to use them effectively, and how to sanitize them properly. Most importantly, you’ll build a simple system so your kitchen stays cleaner with less effort.
Table of Contents
- Why a Kitchen Cleaning Brush Beats a Sponge
- Types of Kitchen Cleaning Brushes (And Their Uses)
- How to Choose the Best Kitchen Cleaning Brush
- Kitchen Cleaning Brush for Dishes (Proper Technique)
- Kitchen Cleaning Brush for Sink, Drain & Faucet
- Kitchen Cleaning Brush for Stove, Oven & Appliances
- How to Sanitize and Maintain Your Kitchen Cleaning Brush
- Common Mistakes to Avoid
- Recommended Brush Cleaning Routine
- FAQs
- Conclusion
Why a Kitchen Cleaning Brush Beats a Sponge
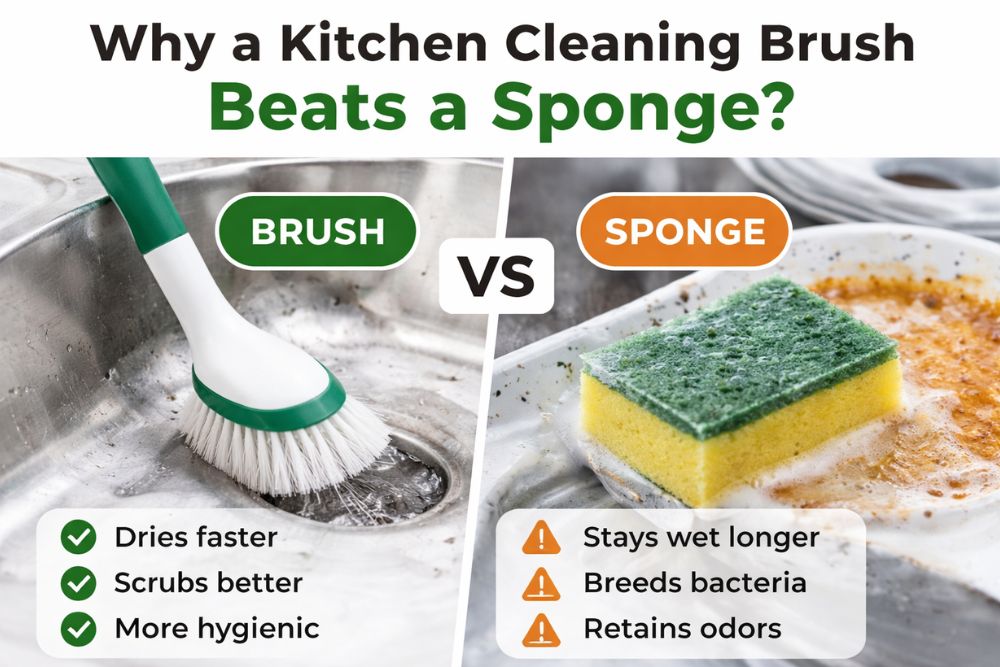
Many people rely on sponges because they’re cheap and easy. But sponges stay wet for hours, which encourages bacterial growth. In contrast, a kitchen cleaning brush dries faster, which helps reduce odor and contamination.
Here’s why brushes often perform better:
- They scrub stubborn grease more effectively
- They reach tight corners and edges
- They reduce hand contact with dirty water
- They last longer than most sponges
- They can be sanitized more easily
Additionally, a brush works better on textured surfaces like stainless steel sinks and grout. As a result, you use less soap and still get a cleaner finish.
Types of Kitchen Cleaning Brushes (And Their Best Uses)
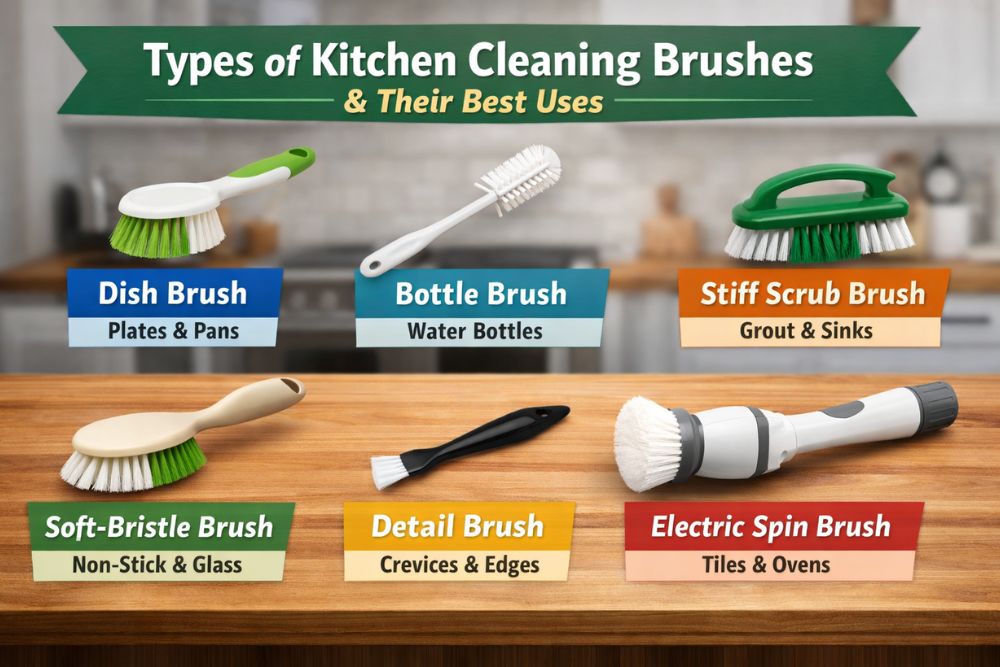
1) Dish Brush (Daily Cleaning Tool)
A dish brush is designed for plates, bowls, and utensils. Most have medium bristles and a comfortable handle.
Best for:
- Dishes and cutlery
- Greasy pans (light to medium grease)
- Daily kitchen cleaning tasks
Avoid using it on: non-stick pans if the bristles are stiff.
2) Bottle Cleaning Brush
A bottle brush has a long handle and narrow bristles to clean inside bottles and deep containers.
Best for:
- Water bottles
- Baby bottles
- Thermos flasks
- Blender jars
This brush is essential if you regularly use reusable bottles. Otherwise, hidden residue can build up and cause bad smells.
3) Stiff Scrub Brush (Heavy-Duty Option)
A stiff brush is a powerful kitchen cleaning brush used for deep scrubbing.
Best for:
- Grout lines
- Sink stains
- Stove drip pans
- Burnt grease on metal racks
However, you should not use it on delicate surfaces because it may leave scratches.
4) Soft-Bristle Brush (Gentle Scrubbing)
Soft bristles are safer for fragile kitchen materials.
Best for:
- Non-stick cookware
- Glass stovetops
- Polished surfaces
- Ceramic dishes
If you want to prevent surface damage, soft brushes are the smarter choice.
5) Detail Cleaning Brush (Small Crevice Brush)
These small brushes are perfect for precision cleaning.
Best for:
- Faucet edges
- Stove knobs
- Appliance buttons
- Refrigerator door seals
Although small, they remove dirt where regular brushes fail.
6) Electric Spin Brush (Optional Upgrade)
Electric brushes save effort, especially for deep cleaning.
Best for:
- Kitchen tiles
- Sink and drain stains
- Oven doors
- Tough grease spots
They are not mandatory, but they can reduce scrubbing time dramatically.
How to Choose the Best Kitchen Cleaning Brush
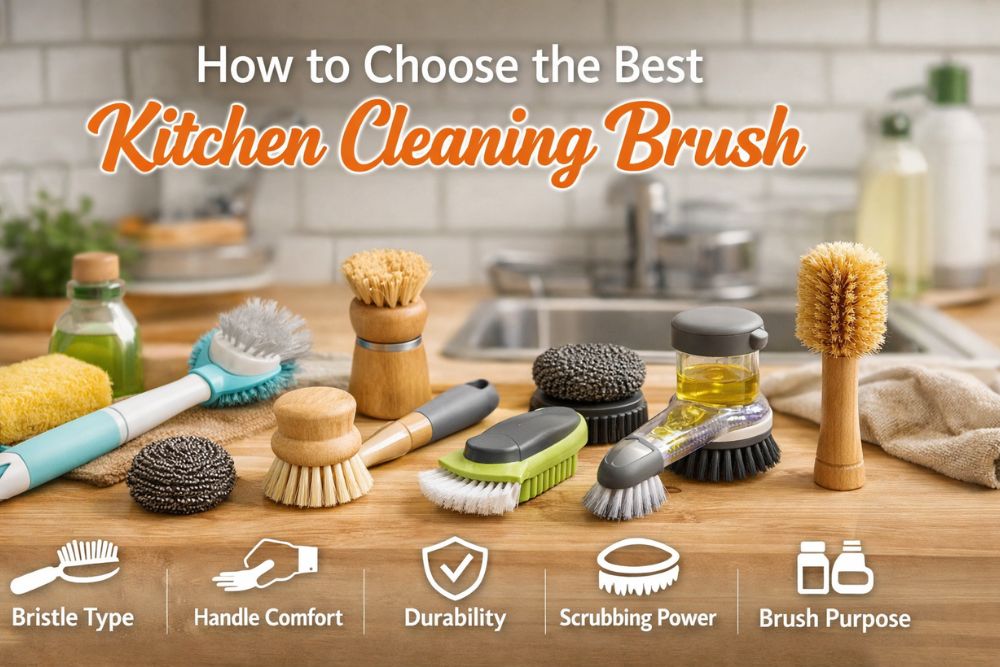
A great kitchen cleaning brush should match your cleaning style and kitchen surfaces. Before buying, check these key factors.
Bristle Material Matters
Different bristles perform differently.
Common options include:
- Nylon bristles (durable, affordable, strong)
- Natural bristles (eco-friendly but wear faster)
- Silicone bristles (easy to sanitize, gentler)
If hygiene is your top concern, silicone is often easier to keep clean.
Handle Grip and Comfort
A brush with a slippery handle becomes annoying quickly. Choose a brush with:
- Rubber grip
- Ergonomic curve
- Strong, stable base
If you clean daily, comfort matters more than you think.
Stiffness Level
Brush stiffness should match the job.
- Soft: non-stick and glass
- Medium: dishes and counters
- Hard: grout, sinks, and tough grease
Ideally, keep at least two brushes: one for dishes and one for deep cleaning.
Size and Head Shape
Flat heads clean surfaces quickly. Rounded heads reach corners better.
A smart setup includes:
- A wide dish brush
- A small corner brush
- A bottle brush
That combination covers almost every kitchen need.
Kitchen Cleaning Brush for Dishes (Best Way to Use It)
Using a kitchen cleaning brush correctly can save water, reduce soap waste, and improve hygiene.
Step-by-Step Dish Cleaning Method
- Scrape food into the trash first
- Rinse dishes quickly with warm water
- Add a small amount of dish soap to the brush or dish
- Scrub from clean to dirty items
- Rinse thoroughly
- Let dishes air dry instead of towel drying
This method prevents grease from spreading to clean items.
Best Brush Technique for Greasy Pans
Greasy pans need more than quick scrubbing.
Do this instead:
- Add warm water and dish soap
- Let it soak for 5–10 minutes
- Scrub in circular motions with a medium or stiff brush
- Rinse with hot water
If grease remains, repeat soaking rather than scrubbing aggressively.
Tip: Keep a Separate Brush for Raw Meat Tools
If you clean cutting boards or knives used for raw meat, keep a separate kitchen cleaning brush. Cross-contamination can easily happen, especially if you use the same brush for plates.
A simple labeling system helps:
- “Dish Brush”
- “Meat Brush”
- “Sink Brush”
Kitchen Cleaning Brush for Sink, Drain & Faucet
Your sink is often dirtier than your toilet, mainly because food particles and moisture collect there daily. That’s why your sink needs dedicated cleaning.
How to Clean the Sink with a Kitchen Cleaning Brush
- Rinse the sink to remove loose debris
- Sprinkle baking soda lightly
- Add a few drops of dish soap
- Scrub with a stiff kitchen cleaning brush
- Focus on corners and drain edges
- Rinse with hot water
- Dry with a microfiber cloth
Drying matters because water spots and mineral deposits form quickly.
Cleaning the Sink Drain Area (Most Missed Spot)
The drain ring holds grime and bacteria. Use a small detail brush to scrub around it.
For better results:
- Pour hot water first
- Scrub with soap
- Rinse again
Do this twice per week to prevent smell buildup.
Faucet and Handles Cleaning
Faucets collect fingerprints and mineral deposits. A detail kitchen cleaning brush works best here.
Quick routine:
- Apply dish soap and warm water
- Scrub around the base and handle joints
- Rinse and wipe dry
This keeps your faucet shiny and prevents dull buildup.
Kitchen Cleaning Brush for Stove, Oven & Appliances
It is most difficult to clean a kitchen with grease buildup. If you delay it, it hardens and becomes harder to remove.
Kitchen Cleaning Brush for Stove Top Grease
For gas stoves:
- Remove grates
- Soak them in warm soapy water
- Scrub with a stiff brush
- Dry completely before reinstalling
For electric or glass stoves:
- Use a soft brush
- Avoid heavy pressure
- Wipe with microfiber cloth afterward
A kitchen cleaning brush is especially useful around burner edges.
Cleaning Stove Knobs and Control Panels
Knobs collect hidden grease and dust.
Cleaning steps:
- Remove knobs if possible
- Wash them with warm soap water
- Use a detail brush for grooves
- Dry completely
- Wipe the panel carefully
This improves hygiene and keeps your kitchen looking newer.
Refrigerator Door Seals (Hidden Dirt Trap)
Fridge rubber seals trap crumbs, syrup, and dust. A small kitchen cleaning brush makes this easy.
Best method:
- Dip brush in warm soapy water
- Scrub gently along the seal grooves
- Wipe clean with damp cloth
- Dry thoroughly
This prevents mold growth and improves fridge efficiency.
Microwave Corners and Door Edges
Microwave doors have tiny crevices that trap grease. Use a small brush.
For fast cleaning:
- Heat a bowl of water with lemon for 2 minutes
- Let steam loosen grime
- Scrub corners with brush
- Wipe clean
This reduces odors and prevents sticky buildup.
How to Sanitize and Maintain Your Kitchen Cleaning Brush
If you don’t clean your brush, you simply spread bacteria around the kitchen. Maintenance is not optional.
Daily Cleaning Routine (After Every Use)
After using your kitchen cleaning brush, do this:
- Rinse with hot water
- Add a drop of dish soap
- Rub bristles with your fingers
- Rinse again
- Shake off water
- Store upright to dry
Drying is the most important step.
Weekly Deep Sanitizing (Best Methods)
Method 1: Boiling Water Soak
- Place brush in a bowl
- Pour boiling water over bristles
- Let sit for 5 minutes
- Remove carefully and air dry
This works well for plastic and nylon brushes.
Method 2: Vinegar Soak (Odor Control)
- Mix equal parts warm water and vinegar
- Soak brush for 15–20 minutes
- Rinse thoroughly
- Air dry
This helps remove smell and mild bacteria buildup.
Method 3: Dishwasher Cleaning (If Safe)
Some brushes are dishwasher-safe. If yours is, place it in the utensil rack.
However, always check the label first because heat can warp cheaper brushes.
When Should You Replace a Kitchen Cleaning Brush?
Even the best kitchen cleaning brush wears out.
Replace it if:
- bristles bend permanently
- brush smells even after cleaning
- handle cracks or loosens
- bristles fall out
- it looks stained and rough
Typically, a good brush lasts 2–3 months with daily use. Heavy-duty brushes may last longer.
Common Mistakes to Avoid with a Kitchen Cleaning Brush
Many people unknowingly reduce hygiene by using brushes incorrectly.
Mistake #1: Using One Brush for Everything
If you use one brush for dishes, sink, and floor-level areas, you spread bacteria.
Instead, assign brushes by task.
Mistake #2: Storing a Wet Brush Flat
A wet brush stored flat stays damp longer. That creates odor and bacteria.
Always store it:
- upright
- in an open holder
- in a dry area
Mistake #3: Scrubbing Non-Stick Cookware with Stiff Bristles
Non-stick coatings scratch easily. Once scratched, they trap residue and lose performance.
Use a soft brush for these itemsMistake #4: Not Cleaning the Brush Handle
People clean bristles but forget the handle. Grease builds there too.
Wipe the handle weekly with soap water.
Mistake #5: Ignoring the Brush Base
The base of the bristles traps food particles.
During weekly sanitizing:
- spread bristles apart
- rinse deeply
- scrub base area
This improves cleanliness immediately.
Recommended Kitchen Cleaning Brush Routine (Simple System)
If you want a cleaner kitchen without extra effort, follow this easy system.
Daily Routine (2 Minutes)
- Rinse brush with hot water
- Soap-rub bristles
- Shake dry
- Store upright
Twice Weekly Routine (5 Minutes)
- Scrub sink and drain ring
- Clean faucet edges with detail brush
Weekly Routine (10 Minutes)
- Deep sanitize brush using boiling water or vinegar soak
- Clean refrigerator door seals
- Brush stove knob edges
This routine prevents grease buildup before it becomes a big job.
Best Kitchen Cleaning Brush Setup (Expert Recommendation)
For a highly efficient kitchen, keep these 3 brushes:
- Dish brush (medium bristles)
- Detail brush (small head for crevices)
- Stiff scrub brush (sink and tough grime)
This setup is affordable, practical, and hygienic.
Conclusion
A kitchen cleaning brush is one of the smartest upgrades you can make for a cleaner, healthier kitchen. It scrubs deeper than sponges, reaches corners more easily, and dries faster, which helps reduce odor and bacteria. However, the real secret is using the right brush for the right job. A dish brush should stay for dishes, while a stiff scrub brush should handle sinks and grease-heavy areas.
Just as importantly, brush hygiene matters. If you rinse, dry, and sanitize your brush regularly, it becomes a powerful tool instead of a hidden germ carrier. Small habits like storing it upright and deep-cleaning it weekly can make a noticeable difference.
If you want a kitchen that stays fresh without constant effort, build a simple brush system and follow a consistent routine. Your cleaning will be faster, easier, and far more effective.
Call to Action:
Want more expert kitchen cleaning guides? Explore more cleaning tool tips on CleanHomeCraft and upgrade your routine today
A medium-bristle dish brush with an ergonomic handle is best. It removes grease while staying safe for most dish surfaces.
Replace your kitchen cleaning brush every 2–3 months, or sooner if it smells, bends, or sheds bristles.
Yes, boiling water is one of the easiest ways to sanitize nylon or plastic brushes. Air dry after soaking for 5 minutes.
In many cases, yes. Brushes dry faster than sponges, which reduces bacterial growth and bad odor over time.
Soak the greasy surface with warm soapy water for 5–10 minutes first. Then scrub using circular motions with a stiff brush.

Muhammad Ahad — Passionate writer sharing informative, engaging, and easy-to-read articles across different topics. Focused on delivering valuable content that helps readers learn, explore, and stay inspired every day.
1 thought on “Kitchen Cleaning Brush Guide (Best Types, Uses & Care Tips)”