


Introduction
The first time I tried kitchen canopy cleaning, I made a classic mistake: I wiped the outside, admired the shine, and thought I was done. A week later, the canopy was sticky again, the smell of old oil returned, and the fan sounded like it was struggling to breathe. That’s when I realized the real dirt isn’t always visible it hides inside the filters, fan cover, and grease trap areas.
If your kitchen canopy looks clean but still smells oily, or your fan airflow feels weak, you’re not alone. Grease builds up slowly, hardens like glue, and turns into a dust magnet. In this guide, I’m sharing the exact method I use for kitchen canopy cleaning that actually removes the greasy layer instead of just spreading it around.
Why Kitchen Canopy Grease Builds Up So Fast
A kitchen canopy is basically a grease catcher. Every time you fry, grill, or cook spicy curries, steam rises and carries oil particles with it. The canopy sucks in that air and the grease sticks to metal surfaces.
Over time, that grease becomes:
- Sticky and yellow
- Thick like wax
- Smelly, especially in humid kitchens
- A fire hazard if ignored too long
The worst part? Even if your kitchen looks spotless, the canopy can still be holding months of old grease.
Kitchen Canopy Cleaning Supplies I Actually Use
I’ve tested many cleaners, and honestly, expensive products don’t always win. The best results come from using the right combination.
Here’s what I keep ready:
- Dish soap (strong degreasing type)
- Baking soda
- White vinegar
- Hot water
- Degreaser spray (optional but helpful)
- Microfiber cloths
- Old toothbrush or small scrub brush
- Sponge with rough side
- Rubber gloves
- Large basin or bucket
- Newspaper or plastic sheet (to protect stove)
If you want the easiest job, do kitchen canopy cleaning when the canopy is slightly warm (not hot). Warm grease loosens faster.
Step-by-Step Kitchen Canopy Cleaning (My Complete Method)
This is the exact process I follow when the canopy is greasy and dusty.
Step 1: Turn Off Power and Protect the Stove
Before touching anything, I switch off the canopy power. If it’s plugged into a socket, I unplug it.
Then I cover the stovetop with:
- Old newspaper
- Plastic sheet
- An old towel
This catches grease drips and keeps cleanup easy.
Step 2: Remove Filters Carefully
Most canopy filters slide out or pop out with clips. I remove them slowly because greasy filters drip oil.
If the filter is metal mesh, it will likely be sticky and heavy.
If it’s charcoal filter type (common in ductless models), don’t wash it charcoal filters are usually replaceable, not washable.
Step 3: Soak Filters in Hot Water (The Magic Part)
This step does most of the hard work.
I fill a sink or bucket with:
- Boiling hot water (as hot as possible)
- 2 tablespoons dish soap
- 3 tablespoons baking soda
Then I soak filters for 20–30 minutes.
Sometimes, I add a splash of vinegar, but only after soaking starts (mixing vinegar + baking soda too early reduces the scrubbing effect).
Step 4: Scrub Filters and Rinse
After soaking, grease becomes soft and cloudy. I scrub using:
- A dish brush or toothbrush
- Sponge rough side for edges
Then rinse with hot water.
If the filter still feels sticky, I repeat the soak for another 15 minutes. When it feels squeaky clean, it’s done.
Step 5: Clean the Canopy Exterior Without Scratching
Now I work on the outer body. Stainless steel canopies scratch easily, so I avoid steel wool.
I use this homemade cleaner:
- Warm water + dish soap
- A small pinch of baking soda for stubborn spots
I wipe in the direction of the steel grain. That small trick keeps the canopy looking new.
Step 6: Clean the Interior Grease Layer
This is where most people skip and where the real smell comes from.
Inside the canopy, grease collects near:
- Fan blades cover
- Corners and edges
- Around light fixtures
I spray degreaser (or soap solution) and leave it for 5 minutes. Then I wipe with microfiber cloth.
For thick grease, I use a baking soda paste:
Baking soda paste recipe:
- 2 tablespoons baking soda
- 1 tablespoon dish soap
- Few drops water
Rub gently, let it sit 5 minutes, then wipe off.
Step 7: Clean the Grease Cup (If Your Model Has One)
Some canopies have a grease collector cup or tray. It’s usually at the back or side.
I remove it, soak it in hot soapy water, and scrub. This small part holds disgusting old oil and is often the source of bad kitchen smells.
Step 8: Dry Everything Completely Before Reassembly
This is important. If filters go back wet, moisture mixes with grease and forms a sticky layer faster.
I air-dry filters for at least 30 minutes or wipe them dry with a clean cloth.
Then I reinstall and test the fan.
Table: Kitchen for Canopy Cleaning Schedule (What to Clean and When)
| Canopy Part | How Often (Home Cooking) | How Often (Heavy Frying) | Best Cleaning Method |
| Outer surface | Weekly | 2–3 times weekly | Soap + microfiber |
| Metal filters | Every 2–4 weeks | Weekly | Hot soak + scrub |
| Grease cup/tray | Monthly | Every 2 weeks | Hot water soak |
| Interior body | Every 2 months | Monthly | Degreaser + wipe |
| Fan cover area | Every 3–4 months | Every 2 months | Paste + deep wipe |
| Charcoal filter | Replace every 3–6 months | Replace every 2–3 months | Replacement only |
This schedule keeps kitchen canopy cleaning manageable so it never becomes a nightmare job.
Best Degreasing Solutions (What Works and What Doesn’t)
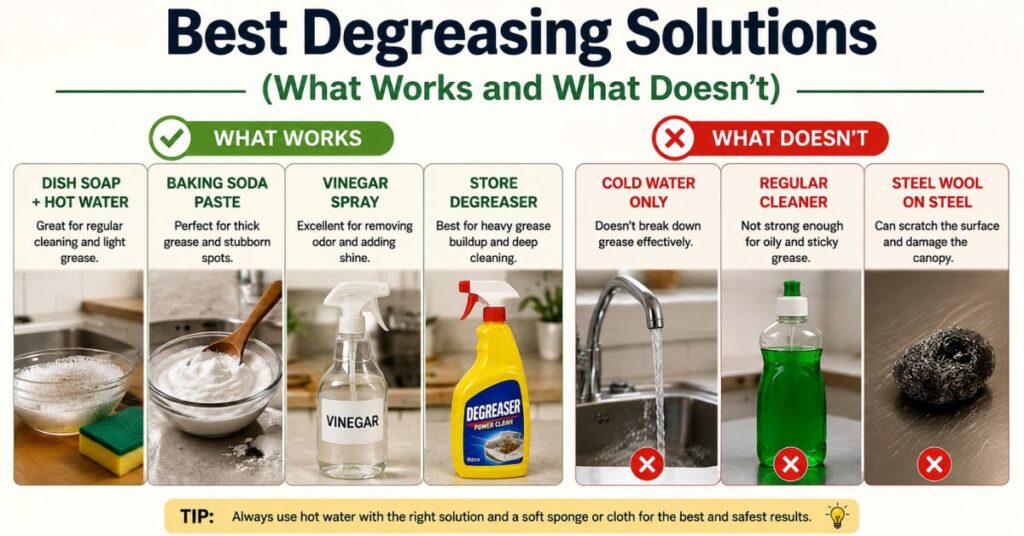
After many cleanups, here’s what I’ve learned.
Dish Soap + Hot Water (Best for Regular Cleaning)
This is my everyday solution. It’s safe, cheap, and effective for light grease.
Baking Soda Paste (Best for Thick Grease Spots)
Perfect for corners where grease hardens like glue.
Vinegar Spray (Best for Smell and Shine)
Vinegar doesn’t always remove thick grease alone, but it removes odor and makes the surface shine.
Store Degreaser (Best for Neglected Canopies)
If you haven’t done kitchen canopy cleaning for 6 months, a degreaser spray saves time. Just ventilate the kitchen and wear gloves.
Common Mistakes People Make During Kitchen for Canopy Cleaning
I’ve made some of these mistakes myself, so I’m listing them to save you frustration.
Using Too Much Water Near the Motor
Never splash water inside the fan motor area. Always use a damp cloth, not a dripping one.
Putting Filters Back Wet
This makes grease return faster and can create a damp smell.
Ignoring the Inside Corners
The corners collect the thickest grease. If you skip them, your canopy will still smell oily.
Cleaning Only When It Looks Dirty
Grease buildup starts long before it becomes visible.
How to Clean a Kitchen for Canopy Without Harsh Chemicals
If you prefer a natural method, this is the routine I recommend.
Natural Deep Clean Mix
- 1 liter hot water
- 2 tablespoons dish soap
- 2 tablespoons baking soda
- 1 tablespoon vinegar (optional)
Use it for wiping interior and exterior.
For stubborn grease, use baking soda paste.
This method works well for most homes and is safe for kitchens with kids.
How I Keep My Canopy Cleaner for Longer
Once you do a proper kitchen canopy cleaning, the goal is to slow down grease buildup.
Here are habits that genuinely help:
- Turn on canopy fan 2 minutes before cooking
- Keep it running 5 minutes after cooking
- Wipe exterior once a week
- Wash filters every 2–3 weeks
- Avoid cooking with extremely high flame constantly
- Use lids on frying pans whenever possible
These small actions reduce grease sticking inside.
Conclusion
A proper kitchen canopy cleaning routine isn’t about making it look shiny it’s about removing hidden grease that causes smell, weak airflow, and potential fire risk. The method that works best is simple: soak the filters in hot soapy water, scrub with baking soda, clean the interior corners, and don’t forget the grease cup.
If you follow this routine once every few weeks, your canopy stays fresh, your kitchen smells cleaner, and cooking becomes more comfortable.
If you found this guide helpful, check out more cleaning routines on CleanHomeCraft.com and build a simple weekly cleaning system that saves time long-term.
For normal home cooking, I recommend cleaning the outer surface weekly and washing filters every 2–4 weeks. If you fry daily, wash filters weekly.
Yes, most metal filters are dishwasher-safe. But I’ve noticed hand-soaking removes thick grease better. Dishwashers sometimes leave oily patches.
Soak them in boiling hot water with dish soap and baking soda for 20–30 minutes. That softens grease so scrubbing becomes easy.
Usually because the grease cup, inner corners, or fan cover area still has old oil buildup. A quick wipe isn’t enough you need interior cleaning.
Not really. Vinegar is great for smell and shine, but heavy grease needs soap or degreaser. Vinegar works best as a finishing wipe.

Muhammad Ahad — Passionate writer sharing informative, engaging, and easy-to-read articles across different topics. Focused on delivering valuable content that helps readers learn, explore, and stay inspired every day.
1 thought on “Kitchen Canopy Cleaning (My Real-Life Step-by-Step Method)”